2. Just for this tutorial I'll make a basic shape and show you how to give it a paper effect. When making the star, press the ~ button in the top left hand corner of your keyboard, if you're on a mac. When you start to drag out, it should start to look like this.
3. Since this specific short cut is creating individual stars, select the whole pattern and group it all together, now we're time for the pattern making.
4. Select the shape and go up to Object > Pattern > Make
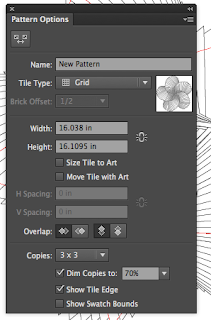
5. Illustrator will now take you to pattern mode and you can do a couple different things from here. As you can see on the picture to the right, this panel should come up when you go into pattern mode and first, of course, name your pattern so you can tell them apart.
 6. Go to the drop down box in the tile type box and select brick by row, in the future you can choose any of these but for this tutorial I'll just be showing you this one.
7. In the upper left hand corner of the pattern options box, you'll see a little button that looks like two boxes going away from each other. Click that and now a blue box should show up around your original pattern and you can change the size of that to determine how close or far you want your shapes to be from one another. In the overlap section, feel free to choose which one you would like to be on top of each other or behind each other.
8. You can then press done at the top of the page and the pattern should go away and the original pattern will be there. Select it, and move it out of the way so your able to show your new pattern. Create a normal rectangle on top of the art board and choose a fill color.
9. Over in the swatches panel, you should now see a little version of your pattern. Make another rectangle over the other one and click your pattern in the swatches panel and it should show up over the rectangle!
I hope you guys enjoyed this tutorial! Happy pattern making!


