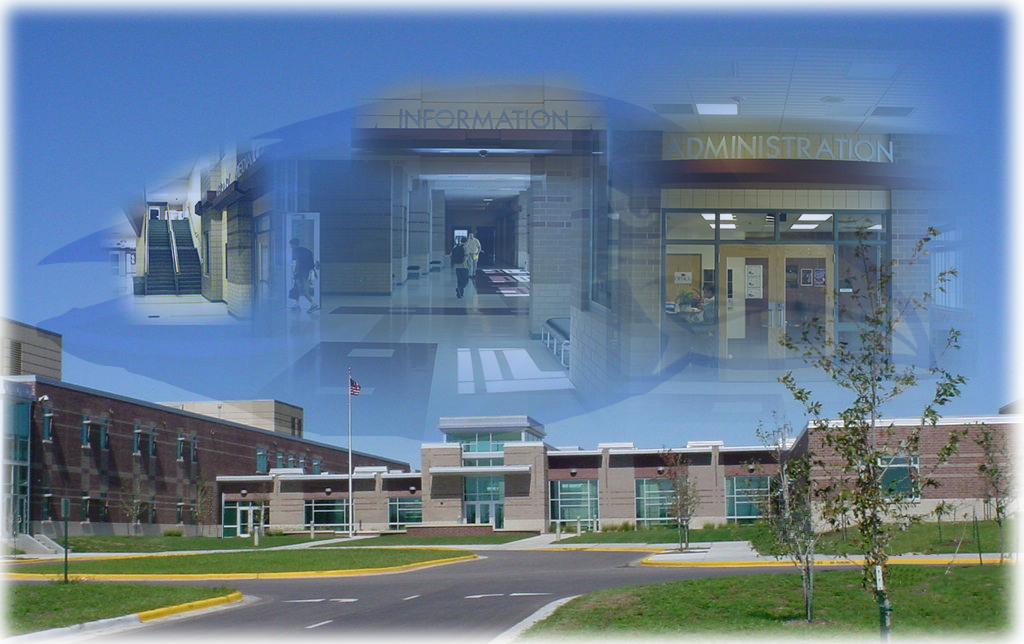
In Photoshop Project #1, we made an ONW and compass transparency photo. First, we got the image of the school and proceeded to get a copy of the compass. I then fooled around with the different effects on the compass and settled with a light transparency and a soft light. After that, I typed "ONW" and made that a transparency. When I was done, I still had time left so I figured why not add my own personal touch to it? I made a copy of the back round just in case I didn't like the new version. Then I got to the Filter Gallery and played around with all the filters till I found the one that fit it just right. In this case, I chose
Underpainting and deleted the original version of the back round. I looked at the image after I was done and made minor adjustments to fit it all together and make it look more centered. Some problems I ran into while making this were being able to find the right tool or filter and since it was our first project on Photoshop, I was still getting used to all the different short cuts and tools. If I were to change anything, I would change the transparency on the compass to more see through. I would also take my time more on the Filter Gallery and play around with all the filters and saturation.
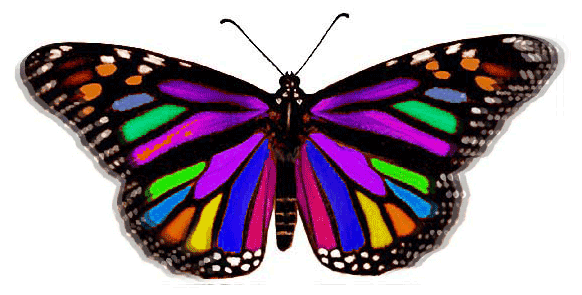
Now onto Photoshop Project #2. This is a butterfly we made, and I named it Penelope. We started from scratch on a orange monarch and first, we selected all the inside selections of the butterfly and played around with the color pad we could use and changed all the inside colors. This was my personal favorite project because we were introduced to the clone stamp, which is a tool in which you can press "Option" and click on a section of the butterfly and drag it out to clone it, hence the name clone stamp. In this case, we gave it the effect that the butterfly was flying. We turned down the transparency and dragged it down the edge of the butterfly. A problem I ran into during this project was the dark purple/pink stripe on the middle of the butterfly. It made in difficult to select the whole stripe, so I had to individually go in and select all of the little sections that were missed. It gave us practice for future references, and sometimes it's good to run into problems. I should have spent more time of the stripe, and if I did this project again I would definitely go back in and change it. Also change the purple under that so the colors weren't so close together.

On Photoshop Project #3, we learned how to use the gradient tool. We started with the back round of the school, and I copied it once again and gave it a cartoon magazine type effect. Then, we held down the text tool and clicked the "Horizontal Type Mask Tool". That tool let us type "NORTHWEST" and it put the marching ants border around the text since it didn't have a fill. After that, we went to the gradient tool and we got to chose whether we wanted black in the middle and blue on the outsides (like mine) or we could have chosen the converse and done black on the outsides and blue on the insides. We played around with that till we found it satisfactory and held down "Shift" while dragging a straight line down the picture. That put the gradient into the picture. I didn't run into much problems during this project, but if I were to change something I would change the Filter on the back round because although I liked it at the time, now that I look at it more I realized I could have chosen a better one or changed the edge intensity and focus as well as the posterazation. I also would have played around with the thickness of the black and possibly changed it to a more thinner effect. What I like about this project was that we got to personalize it a little bit on the back round and I loved that we learned how to make the letters see through and change the width and height of the letters.
Last but not least, Photoshop Project #4. This was my second favorite project because I loved the process of the making the back round as well as the raven. So first, we had to get rid of the unwanted light poles and cars. Your probably think what light poles and cars? That's because we got rid of them using the clone stamp and a new tool called the "Rectangular Marquee Tool". In this tool, you select a section and press enter and Photoshop works its magic in making the object disappear and replacing it with it's guess on the colors around it. For when the light pole got over the school, we used the clone stamp in copying the window or building and placing it over the light pole. After we had gotten rid of the the unwanted stuff, we got onto a new tab and opened the raven. Using a tool called "Magnetic Lasso Tool" we dragged the lasso all the way around the raven and and copied it and pasted it onto the back round tab. We then turned down the transparency and started on the easy part. We opened all the extra images in other tabs and resized them from their original image and then used the mask tool to blend the edges into the photo. If I were to change anything, I would have changed the space between the photos and made the raven more visible. What I loved about our final project was using the clone stamp and the selection tool to erase it and replace it. It gave me a new sense of Photoshop and I know I will probably be back here soon.
